Choose blade size only after checking the manufacturer’s usable cutting dimensions. Measure the food’s cross-section and the space it occupies on the carriage; a blade’s full diameter is not the maximum food height.
This VEVOR listing pairs a 7.5-inch electric slicer with two SUS420 blades. It is a relevant comparison against the brand's single-blade 7.5-inch offer: the useful difference is the supplied blade set, not an assumed jump in motor strength or slicing precision.
This CUSIMAX listing distinguishes itself with two removable 8.7-inch blades and a removable food carriage. It advertises a 1–20mm adjustment range. The practical question is whether the food-contact components you must wash can be removed in a way you are comfortable repeating after each session.
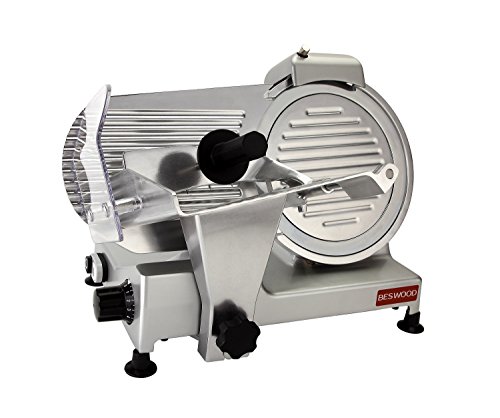
The BESWOOD250 occupies the step between a lightweight food slicer and a larger deli machine. Its listing identifies a 10-inch chromium-plated blade and 240W motor. The buying decision is whether that larger format earns its place on your counter through regular slicing, rather than whether a bigger blade looks more professional.
Suppose your usual roast is six inches tall. It is tempting to conclude that a 7.5-inch slicer must have plenty of room. That comparison treats the entire blade as an open doorway. A slicer is not built that way: its guard, mounting position, food support and carriage determine which part of the cutting edge the food can use.
The useful question is therefore “Will this food travel through this machine in the position I need?” Blade diameter helps narrow the search, but a dimensional check settles the decision. This page shows how to perform that check without treating an advertised size as a capacity guarantee.
Five dimensions that are easy to confuse
Dimension
What it describes
What it does not prove
Blade diameter
The distance across the circular cutting blade
Maximum accepted food height
Cutting height
The permitted food dimension at the cutting position
That a long piece fits the carriage
Carriage or tray size
The supporting area for the food
That every corner of an irregular item clears the machine
Carriage travel
The movement available during a pass
The appliance’s parked footprint
Slice thickness range
The nominal separation between successive cuts
The maximum size of the food you load
These numbers belong in different columns on a comparison sheet. The thickness range is especially easy to misuse. A listed maximum of 15 mm concerns the thickness of one slice, not the height of the roast or the width of a bacon slab.
Manufacturers may also describe dimensions differently. One may give a maximum rectangular cutting envelope, another the tray dimensions, and another only overall appliance measurements. Do not relabel a tray measurement as cutting capacity to make the table look complete. Mark the capacity unconfirmed and ask the manufacturer.
Measure the food in its intended orientation
Start with the face you want on the finished slice. For a roast, that may be its oval cross-section. For bacon, it may be the section that produces a long strip. Place the food on a board in the same orientation you expect it to occupy on the carriage and measure the height and width of that face.
Now measure the remaining length behind the face. That tells you about support and holder engagement. A food item can have a small cutting face but still extend too far for the available support. Irregular shapes deserve measurements at their largest points, not an optimistic average.
Do not include a protruding bone in an argument for buying a bigger ordinary slicer. Food compatibility is a separate condition. A larger diameter does not turn a boneless-food appliance into a bone-cutting machine. Similarly, frozen-food permissions must come from the exact model instructions rather than the blade measurement.
A paper worksheet
Food and preparation: write the actual item, not simply “meat.”
Desired slice shape: complete round, long strip or smaller cooking portion.
Largest cutting-face height and width: measure both.
Length behind the face: include the part the holder must control.
Allowed rearrangement: note whether cutting the item into smaller pieces is acceptable.
Manufacturer capacity: copy the labels exactly and record the model.
This worksheet is more useful than a rule saying that every household needs the same blade size. Two homes buying the same quantity of meat may need different capacity because one slices short deli-style portions and the other wants intact slices from larger roasts.
A ten-inch example that explains the trap
BESWOOD lists its ten-inch model with a maximum cutting length of 210 mm and height of 170 mm. A ten-inch diameter is approximately 254 mm. The manufacturer’s own figures demonstrate why a blade’s diameter and a usable cutting envelope should not be substituted for each other.
Use that example to change the question you ask about any candidate, not as a capacity rule for all ten-inch slicers. A different guard position, carriage or food holder can produce a different working space. Even within one brand, verify the selected size and version rather than borrowing specifications from a nearby product image.
Where a specification is close to your food measurement, avoid planning around perfect alignment. Ask the manufacturer how the limit is defined and whether the intended food can be held correctly at that size. The last fraction of nominal clearance is not a substitute for comfortable control.
How to compare common size bands
The catalog includes 7.5-inch home-style candidates, an 8.7-inch CUSIMAX listing, the ten-inch BESWOOD250 and larger commercial-style options. These are useful starting groups, not four guaranteed levels of performance. Look up the capacity and external dimensions for each specific machine.
Begin with the smaller group if your usual food already fits its documented envelope and you value easier storage. Move to the intermediate group when a particular dimension is missing from the smaller candidate, not simply because the extra diameter sounds reassuring. Compare ten-inch and larger formats when whole-food presentation or recurring large pieces create a measurable reason.
Do not assume a larger blade automatically produces thinner slices. Thin-slice results depend on more than diameter, including food condition and the way the machine controls the cut. If your current food already fits but the slices vary, the first investigation belongs in technique, condition or servicing rather than size.
Worked selection examples
Household A: small cooked portions
This household buys short boneless portions and is happy to divide a larger roast before slicing. Its requirement is flexibility within limited kitchen space. It should first compare documented home-model capacity, cleaning access and exterior dimensions. Paying for the largest blade is unlikely to answer its main problem.
Household B: long bacon presentation
This household wants long, intact bacon strips. Dividing the slab would change the result, so usable carriage length and the intended feed orientation become decisive. A model that accepts the slab’s height but cannot support its length is still the wrong size. Its shopping sheet should begin with slab measurements.
Household C: an existing slicer that tears food
The food fits, yet the user dislikes the result. An upgrade might eventually make sense, but blade size alone does not diagnose tearing. Before replacing the machine, follow the manual’s permitted checks and determine whether the problem changes with food preparation, thickness setting or approved maintenance.
These are hypothetical examples. They illustrate a decision method rather than establish that a particular model passed a cutting test. For actual candidates, the home collection provides product starting points and related selection guides.
Do not forget the blade’s ownership costs
A larger cutting assembly also changes the cleaning and storage question. Before ordering, look for the manufacturer’s blade-handling procedure and approved replacement part. Determine whether you are comfortable performing the owner-level cleaning steps. A large food capacity has limited value if you avoid using the machine because cleanup is impractical.
Replacement fit is not determined by diameter alone. A blade of the same nominal size can have different mounting details or other incompatible features. The blade compatibility guide addresses that separate decision. Never buy a replacement merely because the advertised diameter matches.
Finally, move the selected appliance dimensions onto your actual counter. Include the carriage movement and the area where finished slices will land. Our counter-space worksheet helps you test the full setup rather than just a rectangle in a product listing.
Your final size decision
A practical final note might read: “This model accepts my measured boneless roast in the desired orientation, with a documented working envelope, and it fits my counter during operation.” That is stronger than “I bought a ten-inch because bigger is better.”
If one of those conditions remains unknown, keep comparing or obtain clarification before ordering. Choose the blade size that follows from food fit and usable placement. You are buying a controlled cutting system, and the other dimensions deserve as much attention as the circle at its center.
Check the model against your decision
VEVOR 12-inch 320W slicer: Confirm net weight, working footprint, feed capacity, protective devices and service arrangements.
As an Amazon Associate, we may earn from qualifying purchases.
This 12-inch VEVOR listing advertises a 320W electric deli cutter. It belongs in a larger-machine comparison where the buyer has already measured product size and counter access. More blade diameter is useful only if the complete feed path accommodates the food you actually prepare.