Measure the operating area, not just the appliance footprint. Allow room for full carriage movement, controlled food handling, finished slices and access to the switch, then separately check whether the slicer can be carried and stored comfortably.
This VEVOR listing pairs a 7.5-inch electric slicer with two SUS420 blades. It is a relevant comparison against the brand's single-blade 7.5-inch offer: the useful difference is the supplied blade set, not an assumed jump in motor strength or slicing precision.
This CUSIMAX listing distinguishes itself with two removable 8.7-inch blades and a removable food carriage. It advertises a 1–20mm adjustment range. The practical question is whether the food-contact components you must wash can be removed in a way you are comfortable repeating after each session.
The NutriChef entry lists a 200W motor, removable 7.5-inch blade, food pusher and a 0–15mm thickness dial. Its compact-blade format belongs on a home-use shortlist where modest batches and post-use cleaning matter more than commercial throughput claims.
A slicer can fit on a counter and still be awkward to use there. A product photograph usually shows the carriage in one position and the machine isolated from everything around it. Your kitchen adds a backsplash, wall cabinets, a sink, a cord, a tray of unsliced food and somewhere to collect the slices.
Before comparing finishes or adding a cart to the shopping list, build a simple space plan. You need no special design software. A tape measure, paper and a cardboard rectangle will reveal problems that are easy to miss when comparing online dimensions.
Draw three separate rectangles
The first rectangle is the parked appliance: the published length and width of the exact model. The second represents operation, including the furthest position of every moving part. The third is the complete workstation, including food staging and collection. These rectangles may be nested, but they are not interchangeable.
If the manufacturer gives only the first measurement, do not invent the second. Request a diagram or clarification. Some published dimensions may already include part of the travel; others may not. Adding a universal allowance can be just as misleading as adding nothing.
Area
How to establish it
Common omission
Parked footprint
Exact model dimensions
Using shipping-carton dimensions
Movement envelope
Manual, dimension drawing or manufacturer confirmation
Carriage at its furthest point
Food staging
The tray or container you actually use
A large roast waiting beside the machine
Slice collection
A plate or tray positioned without reaching through the cutting area
Access to remove a full tray
Cleaning access
Owner-cleaning procedure and removal direction
A part that cannot be lifted out under a cabinet
Check the direction of movement
Do not assume that the long side in a photograph should run along your backsplash. Identify the carriage handle, the operator’s position and the direction in which the food travels. Reorient the cardboard footprint accordingly. A layout that looks space-efficient may require you to stand sideways or reach around the body.
Mark the on/off control on the mock-up. Can you reach its location directly without leaning over the food or crossing the path of movement? A control technically within arm’s reach is not necessarily conveniently positioned. Keep the intended operating posture natural and leave the front of the workstation unobstructed.
If two people share the kitchen, consider the person who will actually use and clean the slicer. The footprint should not force that person to work from an uncomfortable side simply because it suits an empty corner. A permanently awkward placement is a reason to choose another model or another location.
Measure height twice
The listed appliance height tells you whether the machine fits under an upper cabinet while assembled. Cleaning may require a second height: enough room to remove a holder, carriage component or other part in the direction specified by the instructions. Check that path before assuming the unit can stay beneath a low shelf.
Opening a nearby cupboard or drawer should not strike the machine. Test the door arc with the cardboard plan in place. Also consider whether using the slicer blocks a drawer containing plates, towels or utensils you normally need during preparation. These interruptions are easy to accept in a showroom and irritating every week.
Do not reduce required clearance by removing a guard or rearranging a component outside its documented operating position. Layout is a purchasing constraint. If a machine fits only when used differently from its instructions, it does not fit.
Use manufacturer dimensions carefully
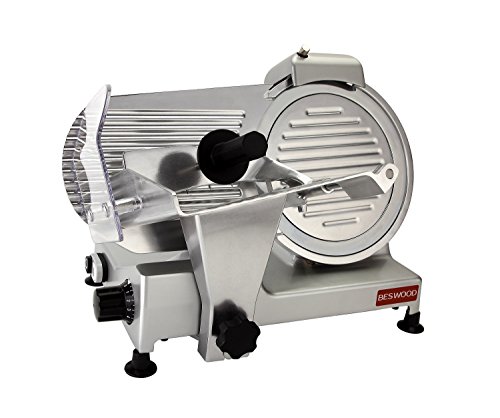
The BESWOOD250 manufacturer illustration gives overall dimensions of 20 by 17 by 14.75 inches and a net weight of 33 pounds. Those figures are enough to reject some small storage locations before considering the finer details. They are not a substitute for confirming its complete operating envelope.
The KWS MS-10NS manufacturer page illustrates another reason to check closely: dimensions appear differently in its specification areas. For an exact-fit installation, ask KWS to confirm the applicable measurement rather than choosing whichever figure is smaller. Product pages can contain rounding, variant information or inconsistent entries.
The home candidates in this collection include several smaller-blade machines, but blade size does not establish exterior size. Do not use a 7.5-inch circle as a proxy for a 7.5-inch appliance. Retrieve the dimensions for the particular ASIN and model you intend to purchase.
Design the food route
Place an empty container where the unsliced food would wait and a second container where the finished slices would collect. Walk through how you would remove a completed tray and replace it. Nothing should require balancing a container on the machine or carrying it through the working area.
Separate raw-food preparation from ready-to-eat tasks according to appropriate food-handling guidance. From a space-planning perspective, the important question is whether you have room for the containers and cleaning process your menu requires. A workstation that works for one cooked roast may feel much smaller during a mixed preparation session.
Think about the final portions as well. If you intend to weigh or package slices, the scale and packaging station need their own place. They do not all have to sit beside the slicer simultaneously, but your sequence should make sense. Photograph the mock-up so you can compare competing machines against the same arrangement.
The storage route is part of the fit
A machine stored in a lower cabinet must travel from that cabinet to the counter. Measure the opening, not just the internal shelf. Hinges, a center stile and the shelf above can reduce usable access. Check whether the machine must be tilted and whether the manufacturer permits the handling method you are contemplating.
Weight matters most when combined with that route. Lifting a machine from waist height is a different task from pulling it out near floor level. If you cannot comfortably move a comparable load, do not plan on regularly lifting the slicer alone. Do not use a blade guard or carriage as an improvised carrying handle.
A cart is not automatically the answer. Its top must accommodate the operating layout, and its stability and load rating must be suitable. Wheels introduce another variable. Follow the equipment instructions and evaluate the entire setup rather than assuming a kitchen cart pictured with appliances is appropriate for this one.
A practical mock-up exercise
Clear the proposed counter and measure its unobstructed length, depth and height.
Make the appliance footprint from cardboard and label the operator side and switch.
Add the confirmed carriage movement using a second strip of cardboard.
Place your actual empty food and collection containers around it.
Open nearby doors and drawers, then walk the storage route.
Record anything requiring you to reach, twist, lift awkwardly or move another appliance.
Do this with two shortlisted models rather than imagining an unlimited number of alternatives. A smaller machine may win because the workflow feels manageable. A larger one may prove workable when rotated into a different location. The exercise turns an abstract dimension table into a real purchase decision.
When a permanent place is preferable
If repeated lifting is the main obstacle, a dedicated position may be more valuable than a modest difference in price. That choice carries its own cost: the counter is no longer available for other work. Consider how often you use it and what it displaces. A slicer used monthly should face a different space budget from an appliance used several times each week.
For occasional slicing, compare the practicality of a smaller suitable machine or another cutting method before surrendering a large workstation. The compact-slicer guide helps screen candidates by the type of space constraint. For broader options, return to the home meat slicer collection.
Place your measurements beside the product listing before ordering. The useful final check is not “Does it fit between the toaster and the wall?” It is “Can I operate, clean and put away this exact machine without making my kitchen harder to use?”
Check the model against your decision
BESWOOD 250: Confirm the cutting envelope, assembled footprint, lifting weight, approved foods and cleaning procedure in the BESWOOD250 manual.
As an Amazon Associate, we may earn from qualifying purchases.
The BESWOOD250 occupies the step between a lightweight food slicer and a larger deli machine. Its listing identifies a 10-inch chromium-plated blade and 240W motor. The buying decision is whether that larger format earns its place on your counter through regular slicing, rather than whether a bigger blade looks more professional.