Before the first slice, match the appliance to its manual, inspect for damage and missing parts, complete the manufacturer’s cleaning and assembly procedure, and confirm a stable working area. Do not power a damaged or incompletely assembled slicer.
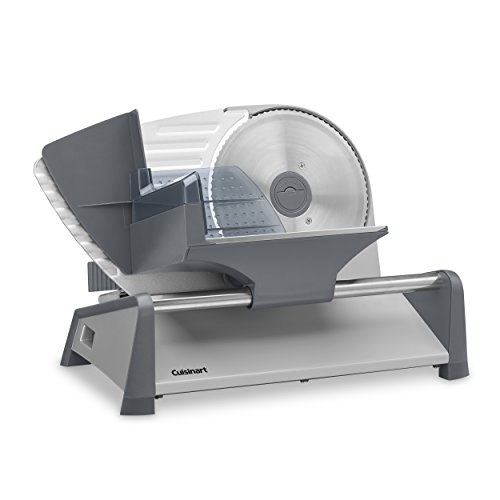
The FS-75 is a home food slicer with a removable 7.5-inch stainless-steel blade. Cuisinart's catalog title identifies a thickness adjustment from 1/32 to 1/2 inch and names bread, roasts and firm cheese. That range is useful for comparing intended slice styles, but it does not establish how cleanly a particular soft or sticky food will cut.
This CUSIMAX listing distinguishes itself with two removable 8.7-inch blades and a removable food carriage. It advertises a 1–20mm adjustment range. The practical question is whether the food-contact components you must wash can be removed in a way you are comfortable repeating after each session.
The NutriChef entry lists a 200W motor, removable 7.5-inch blade, food pusher and a 0–15mm thickness dial. Its compact-blade format belongs on a home-use shortlist where modest batches and post-use cleaning matter more than commercial throughput claims.
Learn what each control does while the machine is disconnected
Choose a small, permitted first task
Recognize reasons to stop
Finish the session properly
The first session should establish that your new slicer arrived complete, fits its intended location and makes sense to you as an appliance. It is not the time to process a large order of food or discover the controls while guests are waiting for lunch.
Keep the original instructions beside you. This guide organizes the decisions surrounding setup; it does not replace the model-specific assembly sequence, blade-handling method or operating limits. Two slicers that look similar can secure their parts differently.
Start with the box, not the power switch
Make room to unpack without balancing the machine near an edge. Keep packaging while you inspect the delivery. Photograph the carton and any visible damage before moving on, especially if a corner is crushed or parts appear loose. This creates a clear record if you need to contact the seller.
Check the model and electrical rating against the order. A familiar brand name is insufficient if the product family contains several sizes or market versions. Save a picture of the rating label and record the model in the same place as the receipt. You will need that information for documentation, parts or support later.
Do not test a visibly damaged machine to see whether it still works. Damage to a cord, plug, guard or cutting assembly should be resolved with the seller or manufacturer before operation. An apparently minor shipping problem is not something to investigate by applying power.
Match the loose parts to the diagram
Lay the supplied accessories out where you can identify them without handling sharp edges unnecessarily. Compare them with the manual’s packing list and diagram. Distinguish parts intended for immediate assembly from spare parts or maintenance accessories.
Some models arrive with assemblies already fitted, while others require specific owner-level installation. Follow the instructions for your exact model rather than a video showing a related version. If a component does not match the diagram, ask the manufacturer before deciding it is optional.
Check
Ready to continue when
Pause when
Identity
Model and manual correspond
Manual covers a different version without clarification
Condition
External inspection reveals no damage
Cord, guard, body or moving assembly is damaged
Completeness
Required supplied parts are accounted for
A guard, holder or fastener is missing
Understanding
You can identify controls and required assembly
A step requires guessing or improvisation
The KitchenWare Station manual, for example, explicitly tells owners to inspect the delivery, check the supplied parts and contact support with installation questions. Its listed components and steps apply to its covered models. The broader lesson is to establish completeness before moving on, not to expect every home slicer to include the same accessories.
Prepare the workstation before preparing food
Put the appliance in its intended operating location and assess the space around it. The surface must suit the manufacturer’s requirements, and the carriage needs room to move. Keep the switch reachable and the food-collection area accessible without crossing the cutting path.
Remove unrelated utensils, packaging and other appliances from the immediate area. Your first session is easier to understand when you are not also solving a clutter problem. Keep children, visitors and pets away from the workspace while you learn the equipment.
Check the electrical requirements in the manual and on the label. Do not modify a plug or improvise a connection. KWS’s manual specifically requires a matching grounded supply for its equipment and prohibits extension cords and power strips; read the corresponding restrictions for your own slicer rather than assuming they are identical.
For a crowded kitchen, use the counter-space checklist before continuing. If the machine cannot be used comfortably where you planned, solve that problem now. A different location is preferable to working around an obstruction during operation.
Clean and assemble in the documented order
New does not mean ready for food contact. Complete the first-use cleaning directions for the appliance, then assemble it as instructed. Read the whole procedure before removing a part so that you know how it will be handled and returned to position.
The Cuisinart FS-75 manual requires the unit to be unplugged for cleaning and prohibits putting its parts in a dishwasher. Those are model-specific directions worth noticing because a removable component is not automatically dishwasher-safe. Do not transfer a care method from one appliance to another.
Have the cleaning and drying area ready before disassembly. Keep sharp components identifiable and protected according to the instructions. If an instruction is unclear, leave the appliance disconnected and obtain clarification. Do not use the first setup as an opportunity for repairs or adjustments beyond owner-level assembly.
Learn what each control does while the machine is disconnected
Locate the power control, thickness adjustment and food-holder arrangement. Read how the manufacturer wants the machine left when not operating. Understand which handles are intended for moving the carriage and which parts should not be used as grips.
Do not confuse the food thickness setting with a motor-speed control. Not every appliance has an adjustable speed, and a numbered dial can mean different things on different equipment. The manual’s labels are more reliable than assumptions based on the appearance of a knob.
Confirm that assemblies are secured by the specified method and that required guards are in their operating positions. Never defeat an interlock or remove a guard to make movement easier. If a part binds after assembly, stop and revisit the instructions rather than forcing it.
Choose a small, permitted first task
Select a food expressly appropriate for the machine and comfortably within its documented capacity. Avoid using an oversized or unusually difficult item as the initial test. The objective is to learn the workflow with a manageable quantity, not to prove that the machine can handle its most demanding advertised application.
Prepare the receiving plate and any containers before operation. Follow the exact manual for loading, starting and slicing. Inspect the result as directed without putting hands near the cutting area. If you need to clear, reposition or investigate something, use the manufacturer’s safe stopping procedure first.
Record what you observe without turning a single session into a performance verdict. Note the food, preparation, setting and result. If the slice is not what you wanted, those details will help separate a setup issue from a food or technique issue during subsequent permitted use.
Recognize reasons to stop
Unexpected contact, a loose part, damaged components, an unusual smell or a malfunction is a reason to stop using the appliance and seek appropriate support. Do not continue a large batch in the hope that a new machine will settle down. Do not reach toward a moving blade to investigate a sound.
For a machine that will not start, use the external-check troubleshooting guide and the manual. A household setup session does not require opening a motor housing or bypassing a protective feature. Warranty support is generally easier to discuss with the model, purchase record and a clear description of the symptom ready.
Finish the session properly
After the trial, complete the shutdown and cleaning procedure. Store the appliance only after the required parts are dry and returned to their documented positions. Keep the manual and spare accessories together so that the next use does not begin with a search for an unidentified piece.
Write down one improvement for next time: perhaps moving the receiving plate, clearing more counter space or choosing a differently sized food portion. That small adjustment is more useful than immediately planning a much bigger batch. Once the routine is comfortable, you can evaluate how the machine fits your usual preparation schedule.
If you are still selecting an appliance rather than setting one up, compare the home slicer options with their available manuals. Clear instructions and manageable assembly are buying features, not paperwork to consider only after the box arrives.
Check the model against your decision
NutriChef 7.5-inch food slicer: Confirm the exact NutriChef model, minimum achievable slice thickness, cleaning access and manual-feed operation.
As an Amazon Associate, we may earn from qualifying purchases.