For deli-style roast beef, start with safely cooled, appropriately chilled boneless meat, identify the grain on a separate board and present a supported face across it. Begin with an intact test slice and reduce thickness gradually. A tender roast that falls apart may not suit fine slicing.
The NutriChef entry lists a 200W motor, removable 7.5-inch blade, food pusher and a 0–15mm thickness dial. Its compact-blade format belongs on a home-use shortlist where modest batches and post-use cleaning matter more than commercial throughput claims.
This CUSIMAX listing distinguishes itself with two removable 8.7-inch blades and a removable food carriage. It advertises a 1–20mm adjustment range. The practical question is whether the food-contact components you must wash can be removed in a way you are comfortable repeating after each session.
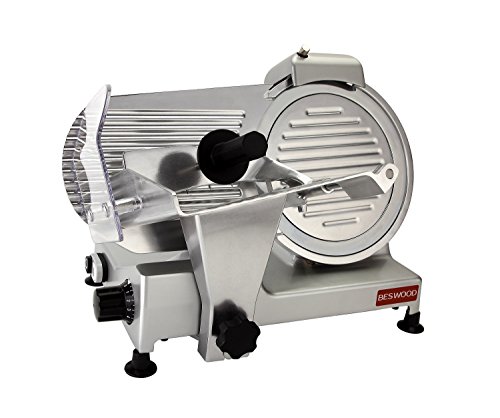
The BESWOOD250 occupies the step between a lightweight food slicer and a larger deli machine. Its listing identifies a 10-inch chromium-plated blade and 240W motor. The buying decision is whether that larger format earns its place on your counter through regular slicing, rather than whether a bigger blade looks more professional.
Find the grain before the roast reaches the carriage
Give the holder a shape it can control
Run a small thickness ladder
Build the sandwich before committing the batch
Recognize a texture problem before blaming the motor
Equipment options to investigate for cooked roasts
Portion without extending the storage clock
What to do with the unsliceable remainder
A roast that makes excellent dinner slices can behave badly when asked to become delicate sandwich meat. Its fibers may separate, its exterior may crumble or its shape may roll away from the holder. The useful question is not simply how low to turn the thickness dial. It is whether this cooked roast has the structure and support needed for the cut you want.
Start with cooling, not the slicer switch
This guide concerns already cooked roast beef, not a cooking recipe or a way to validate doneness. Follow an appropriate cooking process and plan cooling before slicing. FoodSafety.gov recommends prompt refrigeration in shallow containers and keeping the refrigerator at 40°F or below. See its food-safety guidance; do not leave a large roast on the counter until it feels convenient to handle.
Use the slicer only with food conditions the manual permits. A kitchen tip about partially freezing meat may apply to a different machine or a different task. It should not be carried over to a slicer that excludes frozen foods. The goal is a supported, suitable product, not a roast made hard enough to overpower an equipment limitation.
Find the grain before the roast reaches the carriage
Look at a cut face on a separate board. Long parallel fibers reveal the direction you want to shorten with the slice. Turning the roast so the blade crosses those fibers can improve the eating texture, but it may change how the food fits. Resolve both orientation and fit before operating.
An irregular roast can contain areas whose visible fiber direction changes. That may require dividing the cooked meat into manageable sections away from the machine, provided doing so fits your food-handling plan. Do not twist an unsupported roast on the carriage while trying to follow the grain through a running cut.
If the roast has been tied, remove twine and other nonfood material before loading it. Consider whether the outer crust holds together or sheds fragments. A flavorful crust need not be discarded automatically, but loose fragments can make early slices look ragged. Observe which part is failing before concluding that the blade is dull.
Give the holder a shape it can control
A rounded roast may contact the carriage at only a narrow line. A broad stable face is easier to support than a rocking cylinder. Work within the machine’s instructions and use the supplied holder as intended. If the shape cannot be held safely, change the portion on the separate board or choose another cutting method.
Roast characteristic
Likely slicing difficulty
First decision
Rounded bottom
Movement changes the cutting angle
Assess stable presentation with the normal holder
Loose muscle sections
Pieces separate during the pass
Use a thicker slice or a different preparation
Crumbly exterior
Fragments appear around an otherwise intact center
Distinguish crust loss from whole-slice failure
Long visible fibers
Thin slices can still feel stringy
Reorient across the grain off the machine
Face beyond capacity
Incomplete or unsupported travel
Divide appropriately or use a capable machine
Run a small thickness ladder
Choose a moderate sandwich setting inside the model’s stated range. Make a small sample, stop and inspect the pieces away from the cutting area. If they are intact and supported, try a slightly thinner setting. Continue only while the output remains useful. There is no prize for reaching the lowest mark if the result is a pile of torn fibers.
Keep the sample sizes small so you do not turn half the roast into an experiment. You might compare three settings with a few pieces from each, then choose the one that folds without falling apart. The thickness reference offers starting language rather than prescribing one ideal roast-beef measurement.
If all settings fail, changing the dial repeatedly is unlikely to solve the underlying problem. Return to the roast’s structure, its support and the machine’s permitted food conditions. A braised roast designed to pull apart may be better used as pulled beef than forced into intact deli slices. Equipment cannot reverse the texture created by cooking.
Build the sandwich before committing the batch
A slice that looks attractive on a plate may still pull out of the sandwich in one piece when bitten. Assemble a small sample using the bread and condiments you normally use. Compare the bite across and along any remaining visible fibers. This tells you whether the orientation and thickness serve the meal, not just the photograph.
Use similar portion weights when comparing settings. Otherwise the sandwich with more meat may seem better for a reason unrelated to slicing. For a lunch routine, weigh the usable portion and record the setting that produced it conveniently. This gives you a practical repeatable note for the next roast.
Consider whether the meat will be reheated or served cold. A reheating recipe may call for different handling or a thicker piece than a cold sandwich. Follow that recipe’s food-safety instructions; a very thin slice is not evidence that reheating has achieved any particular temperature.
Recognize a texture problem before blaming the motor
Smearing looks like the food surface being dragged or compressed rather than cleanly separated. Crumbling looks like the structure breaking into fragments. A taper is a different symptom: the slice has unequal thickness across its face. Note which is happening and whether it appears on every pass or only as the roast becomes smaller.
If the motor changes sound sharply, the blade visibly behaves abnormally or the carriage binds, stop. Those observations should not become a home stress test. For output problems without a machine fault, the diagnostic article gives an order for checking food condition and support before considering maintenance.
Equipment options to investigate for cooked roasts
The Nutrichef B0CQMMKYHD catalog title lists a removable 7.5-inch blade and a 0–15 mm adjustment range. It is a candidate for modest home portions when the roast fits its documented capacity. The CUSIMAX B0C4YKDMDM lists a removable carriage and two 8.7-inch blades, making blade selection and cleanup procedure useful comparison questions.
The BESWOOD250 B01AQH636Q is a ten-inch deli-format candidate for a more dedicated setup. The listing’s blade size does not prove that a particular roast fits, and we have not tested comparative roast-beef output. Compare these machines through the deli collection using your prepared roast dimensions and the exact manuals.
Portion without extending the storage clock
Keep the original cooking date with the sliced portions. Cutting a roast tomorrow does not make it newly cooked tomorrow. FoodSafety.gov lists refrigerated cooked-meat leftovers at three to four days; see the cold-storage chart and any more specific instructions for your preparation.
Package amounts that match your actual sandwich plan. If you expect more food than you can use within the appropriate storage window, plan suitable freezing promptly rather than waiting until the end of that window. Make labels readable before the packages enter the refrigerator or freezer.
What to do with the unsliceable remainder
The heel can become too small or uneven for the holder before all the edible meat is gone. Stop at the equipment’s limit and move the remainder to a separate preparation area. It can be assigned to another recipe when appropriate, but it should not be chased against the blade by hand.
For your next batch, record where the difficulty began: food shape, roast texture, portion size or actual machine capacity. That observation gives you a precise improvement to make. The family sandwich guide then helps decide whether the overall routine is convenient enough to repeat.
Check the model against your decision
BESWOOD 250: Confirm the cutting envelope, assembled footprint, lifting weight, approved foods and cleaning procedure in the BESWOOD250 manual.
As an Amazon Associate, we may earn from qualifying purchases.